
TM 11-6660-266-13
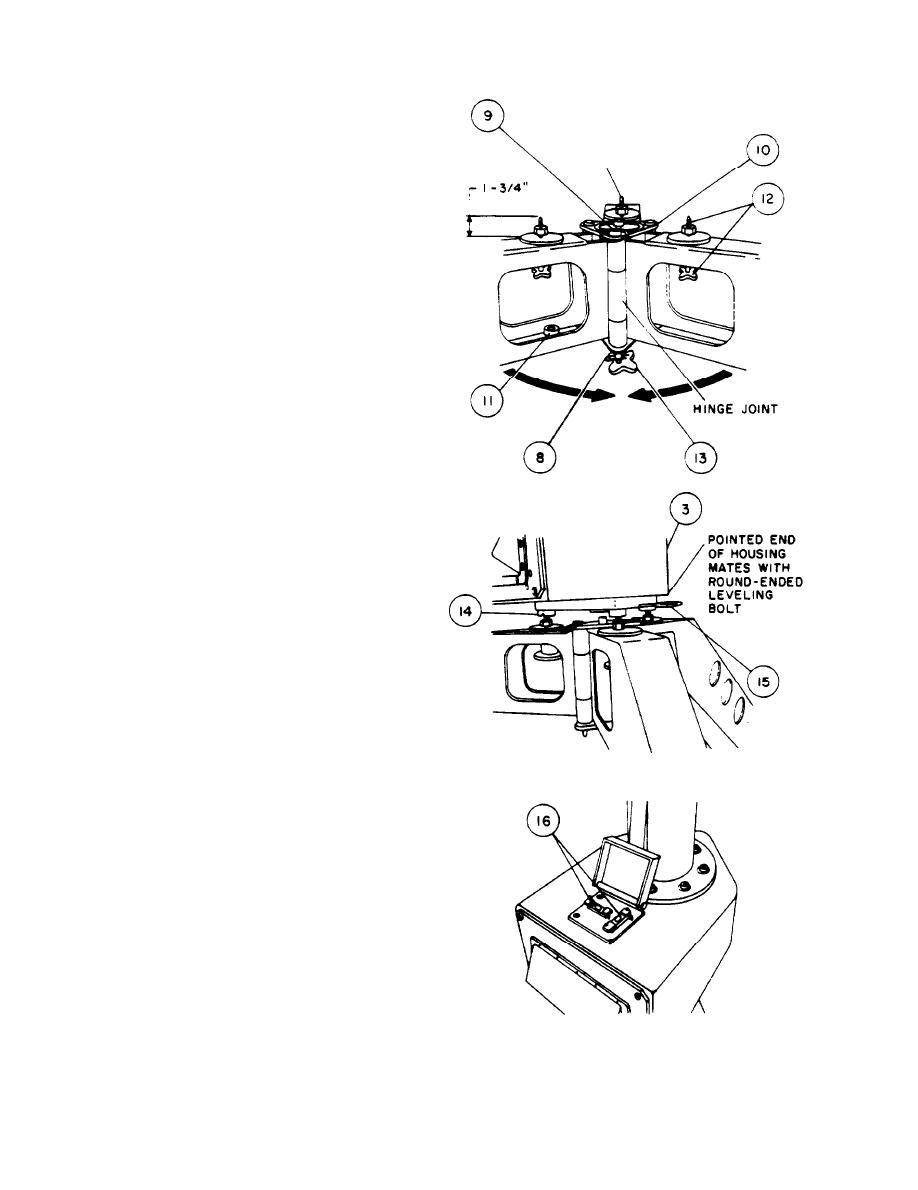
(c) Rotate tripod legs until the hinge joint is
aligned. Reinsert ring-headed pin (9) in tripod
baseplate (10) to lock legs in place. Reinstall
locking clip (8) on ring-headed pin.
(d) Check circular bubble level (11) mounted
inside tripod leg and adjust 3 tripod adjustable
leg mechanisms until bubble level indicates that
tripod is level. Lock adjustable legs (7) in place.
NOTE
The tripod adjustable leg mechanisms
are released by turning locking handles
(5) counterclockwise and locked by
turning clockwise.
(e) Adjust 3 leveling bolts (12) on tripod until
they are approximately at the center of their
adjustment range.
(2) Install azimuth unit (3) as follows:
(a) Remove azimuth unit from case #3.
(b) Lift unit above tripod baseplate (10) and
orient housing so that pointed end of housing is
in line with round-ended leveling bolt. Lower
azimuth unit until 3 round azimuth unit mounting
collars (14) mate with leveling bolts (12) at top
of tripod legs.
(c) Pull tripod centerbolt fork handle (15), push
tripod centerbolt (13) upward, and then release
centerbolt fork handle to hold centerbolt in
place.
(d) While checking 2 linear bubble levels (16)
on top of vertical column base, adjust leveling
bolts (12) until azimuth unit is level. EXTREME
CARE SHOULD BE EXERCISED WHILE
PERFORMING THIS STEP TO ENSURE THAT
AZIMUTH UNIT IS LEVEL.
(e) After azimuth unit is level, turn tripod
centerbolt (13) until azimuth unit is tightly
secured in place.
2-34

 Previous Page
